


These past couple of weeks I've been adding MIL Nan's beaded jewelry to my shop. The pieces are SO gorgeous. For instance this necklace on the left is made with hand painted beads. The beads already have striped effects on them and the painted dots just bring a bit more POP! I love it. And if you look closely you can see the brown beads have a pattern of bronze spots underneath their shiny coat. So marvelous. This piece is made with a strong magnetic clasp to keep it tight.

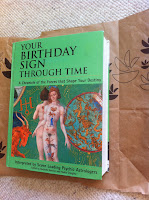
Below you can see the Turquoise and Jet necklace that is also in the shop. It too is ever beautiful. BUT the aquamarine book underneath is too dang bright! I can't use it with too much else. I think it works for this piece but not the others. So, hence this tiny tutorial. Let's begin.
Reasons to cover your books:

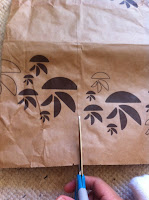 Step 2. Make sure that the bag is tall enough to fit the book you're starting with. Find the seam and cut it down the bag towards the bottom.

 Step 3. Lay the paper flat in front of you, because people don't work from behind or the sides.. you silly. Here is where you can decide if you'd like to use the outside or the inside of the bag as the cover. For this tutorial I'm using the inside, but in the other photos you will see that for my small book I used the outside. I liked the abstract jellyfish design that the local grocery store has as their symbol.


 And Voila! You've got a book cover that only cost you a weeks worth of groceries ^_^
- School mandate
- A craft for creative wee ones (they'll love decorating them)
- To create dust jackets
- Just to make things simple and cohesive ...
- For photography purposes and staging.
And here we go.
Step 1. Grab your supplies. You're going to need A clean paper bag, preferably without wrinkles, scissors, your book(s), and tape (optional).

 Step 2. Make sure that the bag is tall enough to fit the book you're starting with. Find the seam and cut it down the bag towards the bottom.
 Continue around the base of the bag removing the rectangle.

 Step 3. Lay the paper flat in front of you, because people don't work from behind or the sides.. you silly. Here is where you can decide if you'd like to use the outside or the inside of the bag as the cover. For this tutorial I'm using the inside, but in the other photos you will see that for my small book I used the outside. I liked the abstract jellyfish design that the local grocery store has as their symbol.
 Anyhow, lay the book in the center so that there is room above and below it and be sure it can wrap around completely.
Step 4. Fold the bag inside the front and back of the cover.

Step 5. Making nice creases fold the top and bottom over. you'll be using these as guidelines next.

Step 6. Unfold and remove the book, Don't worry! You're almost done ;) Now fold up the bottom edge and fold the top edge down. Use the book as a reference if necessary.

Step 7. So close. Tuck the jacket flaps around the book cover ends like so. And make sure it's not SO tight that it rips the corners.


Now you can let the kiddies decorate them with fun things, leave them plain, add a doily? I might do the latter in a while but my doilies are red right now.. bleh. Hope you liked it!! Pin away XD.
Xo,
Bri
No comments:
Post a Comment